Learning how to effectively use a content planner for my handmade skin care business was the biggest piece of the puzzle that (finally) resulted in a full-time income.
I spent YEARS posting picture after picture of my products on social media, pinning all the Pinterest pins, trying to perfect SEO, etc. without seeing consistent results from my efforts.
While working full-time HOURS on my business, I was not even close to generating a full-time income.
Sound familiar? (Good news ahead…)
Once I mastered the concept of using a content planner and how it helped in carrying out my actual business PLAN, everything went up.
Sales went up, productivity went up, efficiency went up, confidence went up, and the FUN I had building my business went up.
I am beyond excited to share my process and template so that you can experience the same in your own skin care business!
This post may contain affiliate links, meaning I get a commission if you decide to make a purchase through my links (at no cost to you). Please read the disclosure for more information.
What is Content Planning?
In a sentence, content planning is when and how you organize ALL of the information you put out into the world about your business in a strategic way.
For a career skin care maker, this could include:
- Product launch dates
- Sales and events
- Writing/Publishing Blog posts
- Outgoing emails and newsletters
- Social media posts
- Pinterest pins
- Other marketing avenues specific to your niche
Keeping all of that information organized is best achieved on a dated digital spreadsheet (also known as a content planner) that you can make yourself or get access to immediately here:
Why Use a Content Planner as a Skin Care Business?
Efficiency:
Most skin care entrepreneurs are a business of ONE. It’s a lot to juggle.
Keeping a content planner is a very clean, impactful way to see your business tasks all at once.
Assigning yourself tasks all in one spot and checking them off as you go identifies which aspects of your plan are working for you and which ones you need to manage differently.
Strategy:
If you set up a content planner strategically (we will do that together in steps 1-10 below), you will see how all of your efforts connect together and how each cell on your spreadsheet is the piece of a larger business plan.
The visual impact of a well-planned spreadsheet is incredibly motivational and helps business owners to stick to an actual marketing strategy.
How to Set Up a Content Planner:
Setting up a content planner that works to BUILD your business (i.e., an actual strategy) is much different than simply plugging tasks into a certain day and column on your spreadsheet.
Going through the steps below to set up a content funnel is the ticket to an efficient and organized plan.
Step 1: Set Goals for the Year
Set an Annual S.M.A.R.T. Goal:
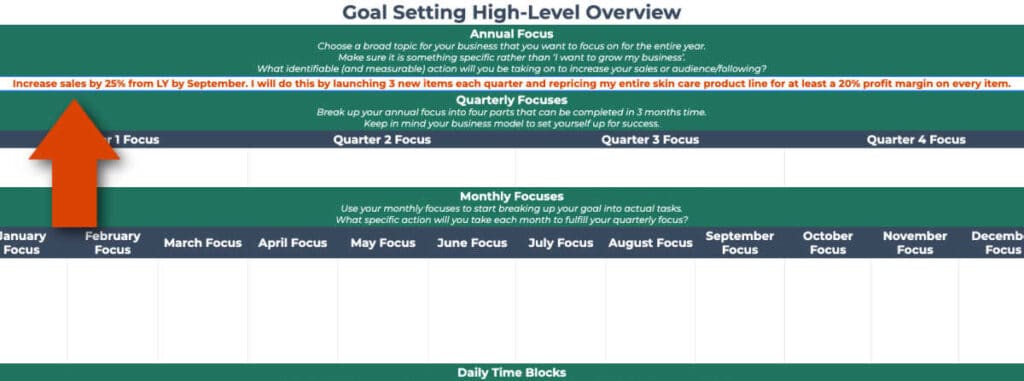
- Example – Annual Focus: Increase sales by 25% from LY by September. I will do this by launching 3 new items each quarter and repricing my entire skin care product line for at least a 20% profit margin on every item.
- (Is this not sounding familiar? Learn how to set S.M.A.R.T. goals for your handmade skin care business here)
Set Quarterly Goals (break your annual goal into four goals based on what you already know about your next twelve months):
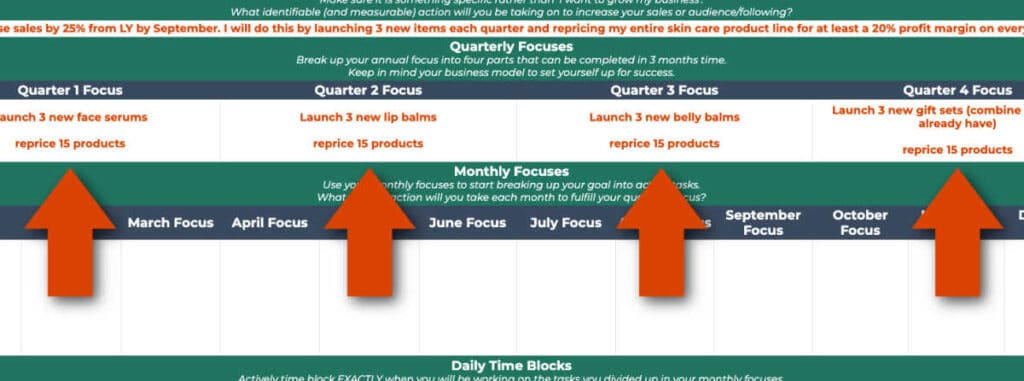
As makers, our busiest season is Quarter 4 in preparation for the holiday season (you may have other peak seasons depending on your business model and demographic).
Keep these times in mind as you plan. You won’t be able to put the same amount of energy into a rebrand or new product formulation while also fulfilling Black Friday orders. Plan mindfully.
Break Quarterly Goals Down into Monthly Goals:
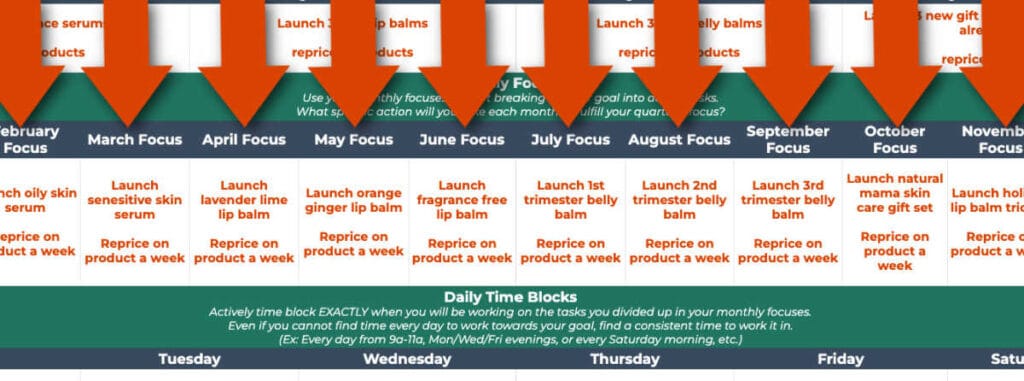
Business ideals aside, don’t forget about your personal schedule. Do you have a vacation planned in the coming year? Or kids with full activity schedules?
Note: You should always be working towards your goals…make sure they’re planned in a way that will set you up for success and balance.
Set Up Daily and/or Weekly Time Blocks Based on Goals:
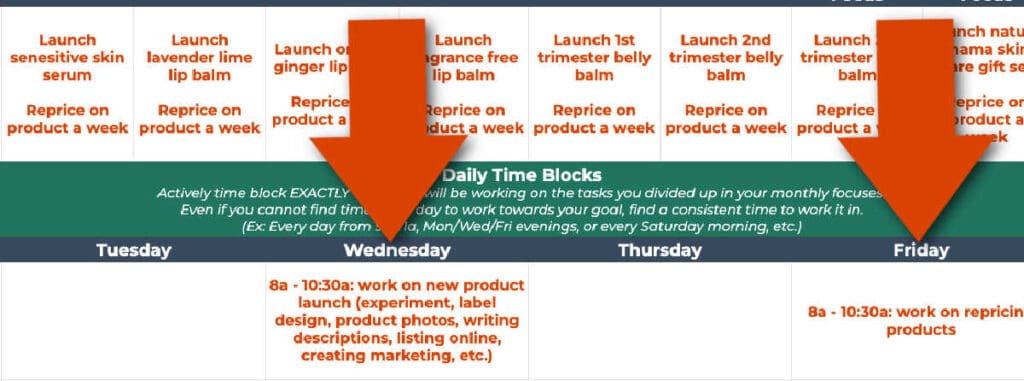
Dedicate a certain time every single week that you will be working specifically on your goal.
Consistency is key.
Each morning from 9a-11a? M/W/F evenings from 7p-9p? Every Saturday morning from 8a-10a? Choose the one you are most able to stick to.
Step 2: Add Goals to the Content Planner Monthly Tabs
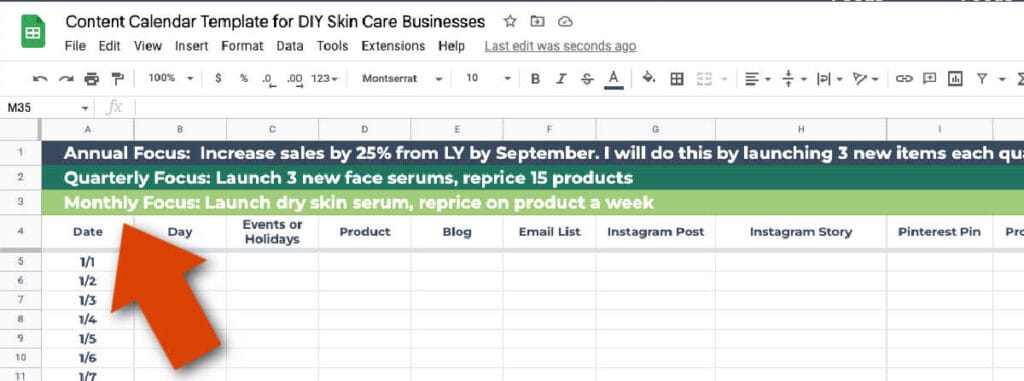
- Copy your annual, quarterly, and monthly goals to the top of every corresponding monthly tab in your content planner spreadsheet.
- This not-so-small detail will be a visual reminder every day of your main focus(es), which will help to guide all of your other content, as well as the unplanned business choices you need to make on the fly.
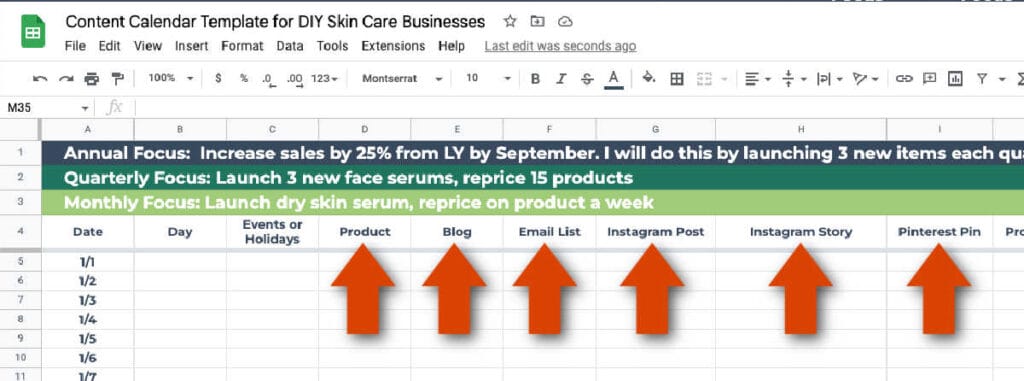
Step 3: Organize Your Content Planner Columns by Priority
- Edit the column headers on your content planner template in order of the LARGEST (most macro) of your tasks on the left down to the SMALLEST (most micro) on the right (your column headers and tasks will be unique to your own business).
- I organize this by the actual size of the content I am creating. This way, I can repurpose content very efficiently. (As an example of repurposing content, if I write a blog post first, I can then simply copy certain paragraphs or sentences of it as captions for my Social Media Posts and Stories.)
- By arranging them in this order on my content calendar, I visually know what any cell on any day will be referring to/supporting. (This will make more sense in steps 7 & 8, hold tight!)
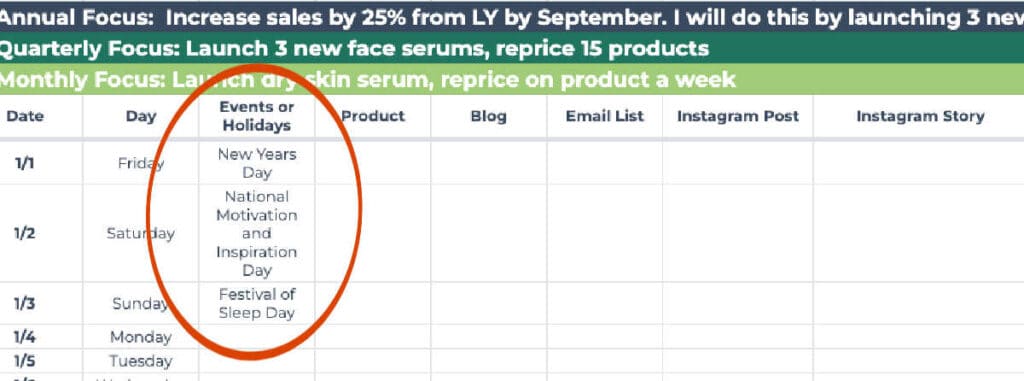
Step 4: Add Skin Care & Beauty Holidays to Your Content Planner ‘Events’ Column
- As you are considering the columns for your content planner, be sure to add a separate column for any skin care or beauty holidays.
- This column can be done at any time, but I like to do this as a first cell-filling exercise. It helps to overcome the feeling of working on a ‘blank canvas’ – it gets some spots filled in right away.
- While holidays don’t specifically support overall annual goals, it’s content! The goal of social media isn’t always to sell or educate, but rather to keep your business top-of-mind. Just make sure you’re keeping your holidays on brand!
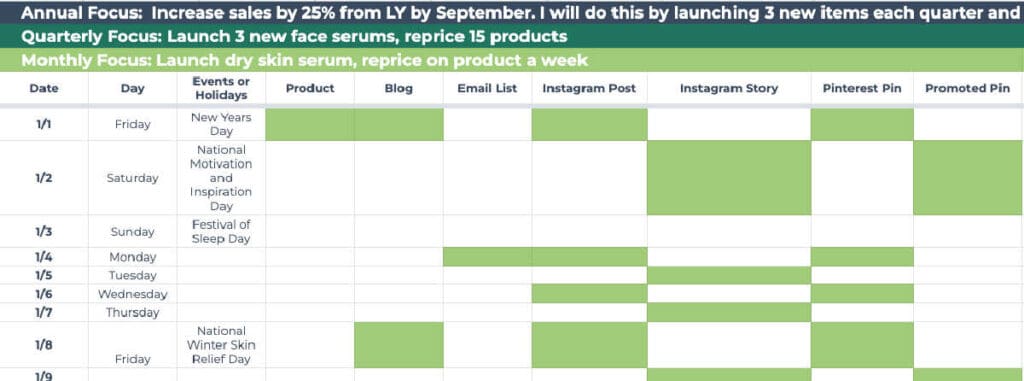
Step 5: Create a Visual Publishing Schedule in the Content Planner Cells
- Create a visual publishing ‘schedule’ by deciding how often you will be tending to each of your column topics throughout the month/week.
- Change the cell color of each ‘action date’. E.g., how often you’ll be launching a new product, which day(s) you’ll be posting to Instagram, which day(s) you’ll start promoting a Pinterest pin, etc. This changed cell color will mark that an action needs to take place.
Step 6: Check Your Content Planner for Schedule Balance
- Before filling in the colored cells with actual content, do a visual self-check to see if the schedule you set for yourself is ACHIEVABLE, which will be easy to see with the color-coding you did in step five.
- Most of us are a business of ONE, meaning we have to do every task ourselves. The ideal publishing schedule isn’t always a realistic publishing schedule. We can’t do #allthethings WELL.
- Tweak your task list and schedule as necessary to maintain balance, consistency, and some room for the unexpected.
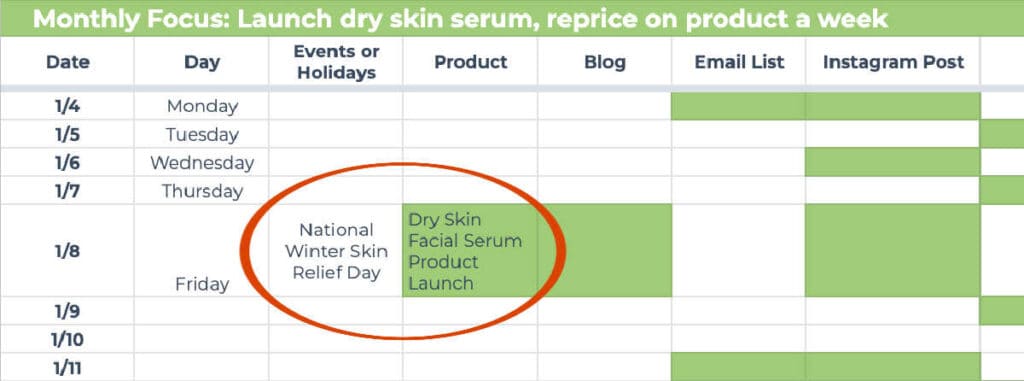
Step 7: Fill in Your Most Important Tasks
- Starting on the left with your most MACRO task column (which I am assuming will be product launches for your skin care line), fill in your cells with the exact details you’re planning to take action on the corresponding date.
- PRO TIP: If you’re not sure when to launch an item, use branded skin care holidays as a guide (new lip scent on National Lip Day, new aphrodisiac aromatherapy roller launched three weeks before Valentine’s Day, etc.)
Step 8: Plan in Order of Importance
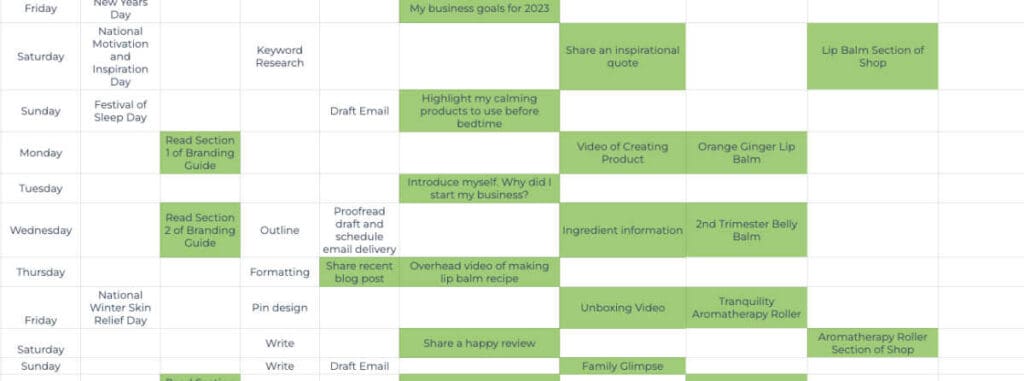
Every item on the rest of your digital content planner should trickle down from your macro task.
My personal business model example: After I create a product, I publish:
- A blog post to promote it
- A separate email newsletter sharing each new blog post
- Three Instagram posts and three Instagram Stories to support blog post (which supports the new product) – be sure to check out the Skin Care Social Media Calendar for content ideas.
- Three Pinterest pins (supporting the blog post and new product)
- One promoted pin
Step 9: Content Planner Management
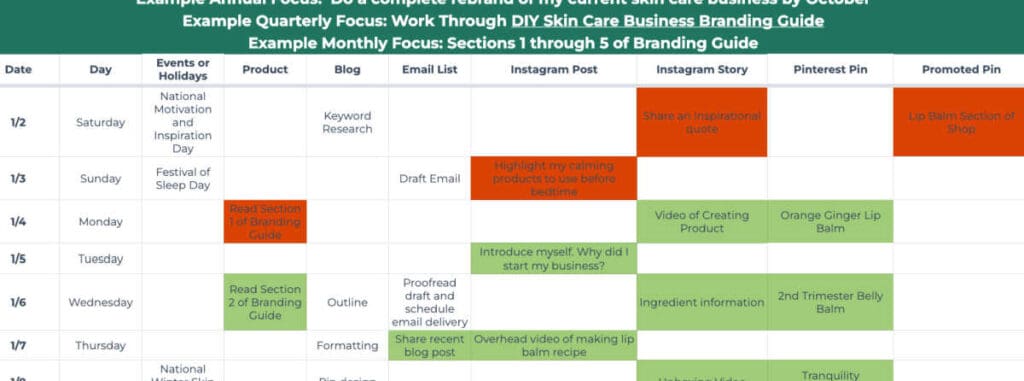
- Once you lay the groundwork (and you just did if you followed along in the steps above!), managing your business content planner is simple.
- Have it up on your computer as an open tab EVERY DAY to keep your goals in mind and a super-clear focus.
- Use your content planner as a visual to-do list by changing the color of a cell after a task has been completed.
This is motivational, as well as helps to highlight any trends in your publishing schedule – is there one platform that you’re always missing a post on? Are you having a hard time getting newsletters written by the scheduled date?
These are cues to revisit your overall task load and strategy.
Step 10: Quarterly Content Planner Review for Your Skin Care Business
- Planning a whole year at a time (broadly) is recommended so that you can visualize the long term. However, checking back and looking ahead at the beginning of every quarter is also helpful.
- Evaluate your quarter and see if your content planner needs to be tweaked or updated. Life happens, customer feedback is received, and goals shift. Don’t be afraid to bend if it means greater opportunities (or sanity)!
Learning how to use a content planner for my handmade skin care business has been the BEST tool for my overall success.
I look forward to hearing how it keeps you on track toward your goals as well!
Grow Your Skin Care Business!
Browse through the resources below to boost your handmade business visibility and profitability!
