
For handmade sellers, nothing can come close to the impact and memorability of writing sincere business thank you notes to your e-commerce customers.
I give all the credit to my mother for making me sit down as a child to write genuine thank you notes after every gifting event – I firmly believe my business foundation was built with the bricks of notes I have sent out.
Whether you had a caregiver teach you the ways of a well-crafted thank you or not, this post will cover the benefits of learning this art, tips for putting it into practice, as well as how to easily design your cards for maximum engagement and customer retention.

This post may contain affiliate links, meaning I get a commission if you decide to make a purchase through my links (at no cost to you). Please read the disclosure for more information.
Benefits of Writing Business Thank You Notes as a Handmade Seller
Benefit #1: You’re Providing a Memorable Unboxing Experience and Connection
Writing thank you notes and including them in your customers’ packages creates a memorable unboxing experience, especially if it’s written in your own handwriting.
This creates validation for your customers before they even see their products because they’ll be reminded and feel good about supporting an actual person instead of a big box company.
As Maya Angelou so wisely said, “People will forget what you said, poeple will forget what you did but people will never forget how you made them feel.”
Including a thank you note makes your customers feel appreciated, feel validated, and feel seen.
Your customers will carry this fuzzy happiness with them, all thanks to your handwritten note, mentioning your business to their friends and your business logo stored away in their visual memory.

Benefit #2: You’re More Likely to Receive a Positive Review
Customers love boosting up small businesses (otherwise they wouldn’t have placed an order to begin with, yes?) – but people DO tend to get busy and may open their shipment in a rush.
Including a thank you note (along with some amazing attention to unboxing details) will help them to pause and remember that you are (most likely) a one-person show and took the time to write to them.
In turn, they’re more likely to take the time to navigate back to your website to leave a review (make sure you consider the design tips in the following tutorial section to make it easier for them).
Benefit #3: You’re Less Likely to Receive a Not-So-Good Review
As e-commerce handmade sellers, we have to deal with some things that are out of our control.
Shipping companies, shipping times, how long our packages have been sitting on a delivery truck, and how items are handled during their shipping journey.
If something unfortunate happens between you taking the package to the post office and it arriving at a doorstep, when your customer opens it up and sees a handwritten thank you note, they’re once again reminded that they’re shopping with a real person.
With this realization, they’re less likely to go straight to your website or marketplace to air their grievances about a mishandled package.
They’re MUCH more likely to reach out to you first and say, “Heeeey, soooo, I got your package and ‘XYZ’ happened. I can tell from the care that you put into my order and your thank you note that ‘XYZ’ isn’t typical so I thought I’d reach out to you first. What can we do?”
(Yes, this is a 100% real response that I’ve received in my own shop…and several others not so very different!)
Since you reminded your customers that a real human being is behind your handmade business, they’re more likely to give you grace (and even a POSITIVE review based on how you handle the unfortunate ‘XYZ’ situation).
Tips for Writing Genuine Business Thank You Notes for Handmade Sellers
Tip #1: Include Your Customer’s First Name
Anyone can write a quick ‘thank you’ without putting personalization to it. Better than nothing, to be sure!
Adding your customers’ names to business thank you notes makes a HUGE impact and only takes an additional thirty seconds to look at the order on your screen before writing!
You can make this simple step completely branded as well!
Are you a casual, fun business? Start with “HEYYYY Customer!…”
A little more reserved? Stick with the traditional “Dear Customer…”
Excited a loyal customer placed yet another order? Show your excitement (and recognition of their loyalty) with a “CUSTOMER!!!…”
Tip #2: Validate Their Purchase
Saying something validating about the item(s) your customer chose will help them to have a positive experience with it before even trying it.
“Wow, I’m so glad you chose this organic lip balm scent, it’s our top seller!”
“Ooo, love that you are trying the dry skin facial serum, this is a must for my daily skincare routine also!”
“Oh mama, you are going to LOVE this natural belly balm – this has been a customer favorite for years!”
Tip #3: Remind Them to Reach Back Out
Some e-commerce specialists suggest that asking for a review in a thank you note is a business fopaux, but I beg to differ!
It’s all about how you approach it!
I have had great success with saying something along the lines of, “I can’t wait to hear which scent is your favorite!” or “Be sure to let me know what you think after you’ve tried this for a few days!”
The biggest tip by far is to make it EASY for your customers to know HOW to leave a review.
If you decide to sell on Shopify, there are review plugins that automatically send an email reminder with a direct link (or even a review form embedded right into the email).
If you are selling on a marketplace such as Etsy, they’ll do the legwork for you by sending out review reminders on your behalf.
In the case that you have a direct link to a review page on your site, don’t be shy about adding a corresponding QR code to your thank you note!
Include a gentle nudge to scan the code to provide feedback (there is a visual example of this in the design tutorial below for a two-sided thank you note).
Tip #4: Include a Branded Closing
There are so many ways to close out a thank you note to keep it on-brand with your handmade business.
Are you in the wellness industry? Try, “In good health, (your name)”.
Or maybe a more professional brand? Add, “Sincerely, (your name)”.
Have a customer base that is geared towards a New Age/metaphysical lifestyle? End with adding a, “In love and light, (your name)”.
Tip #5: Include Your First Name
This may seem silly to you, as YOU know you are the head honcho of ALL tasks in your handmade business.
However, don’t forget to add your first name to your business thank you notes!
Your customers have visited your website, they most likely know you’re a handmade business, and they see photos and videos of you on your social media posts or other online marketing efforts.
Coming around full circle and signing your name reminds your customers that your small business is indeed JUST you, leaving them more likely to do you a solid by going back to leave you a review or providing repeat business.
Keep scrolling to see these tips combined in some example business thank you notes for handmade sellers!
Example Business Thank You Notes for Handmade Sellers
The key to effective business thank you notes as a handmade seller is to have a variation in the notes you write.
You will have loyal customers who shop with you frequently, and nothing kills the sincerity of a note than sending the same sentiment over and over again.
Especially at the beginning of your business journey, take the extra time to view your customers’ purchase history to highlight their awesomeness in your thank you note.
Example 1: First-Time Customer
Hi (Customer),
Thank you for your order and shopping with (your business name)! You made a great choice for your first purchase with me, this natural alkanet lip tint is a customer favorite! I can’t wait to hear what you think!
In health and wellness,
(Your name)
Example 2: Repeat Customer
Hey (Customer)!
I’m so excited that you came back to get another jar of natural cuticle salve! Don’t forget that you can also use this as a first-aid salve for cuts and scrapes – a go-to in our medicine cabinet! Thank you so much for your repeat business!
In gratitude,
(Your name)
Example 3: Long-Time Loyal Customer
(Customer!!!)
I just love seeing your name pop up, I hope you’ve been well! You have purchased all of the mica-tinted lip balms we offer now, be sure to let me know what your favorite shade is 🙂 Your continued support means the absolute world to me – thank you!!!
Most sincerely,
(Your name)
How to Design Thank You Notes for Your Handmade Business
In the step-by-step design tutorials below, I’ll be showing you how to create business thank you notes in two different ways using Canva (a free online graphic design program) and Avery (an online label and printing company).
Designing One-Sided Thank You Notes (Print from Home)
In this first tutorial, we’ll be making a one-sided thank you note that we’ll be printing from home (if you want these printed professionally for you, simply scroll down for instructions below in the two-sided tutorial).
We’ll be creating a thank you note that is 4.25″ x 5.5″, a standard postcard size (the same as an 8.5″ x 11″ piece of paper folded into quadrants) so that it’s super approachable to design and print from a regular office printer.
Order this: Heavyweight Blank Postcard Paper for Printing – 100 Sheets
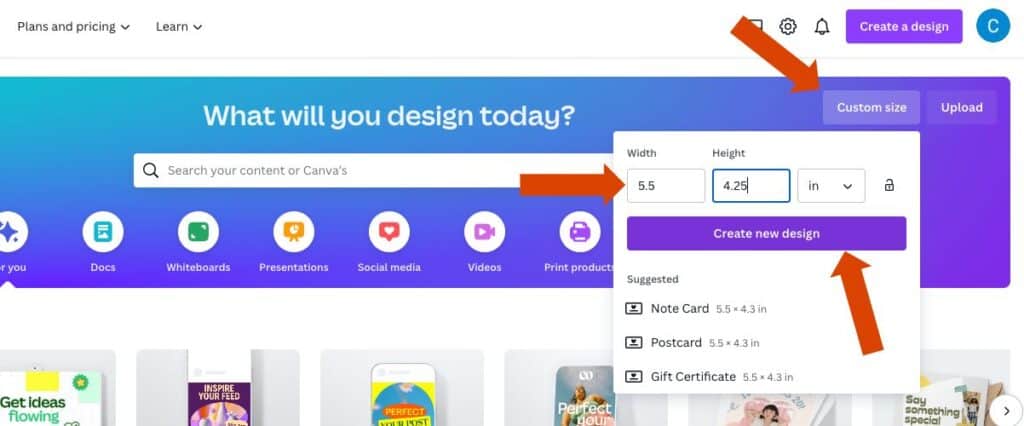
Go to Canva (create a free Canva account here if you don’t have one already) and click on ‘Custom Size’ and type 5.5 and 4.25 inches and click ‘Create New Design’.
Our goal is to create a simple, one-side design that is branded with your handmade business logo and contact information.
If you followed the business logo design tutorial in Canva with me, you’ll have several logo designs you can choose from in your projects folder.
Click on the one that you’d like to pop right onto your postcard canvas (if you didn’t create one in Canva, you can easily upload one from your computer by clicking on the uploads icon in the left black toolbar).
Change the logo to whatever size you would like by selecting all components (text and graphic) and dragging the white dots on the corner.
At this point, decide if you’d like your logo to represent your branded color palette or if you’d like it to be in grayscale since you’ll be printing from home (black ink costs less than colored ink). Update your logo on the canvas accordingly.
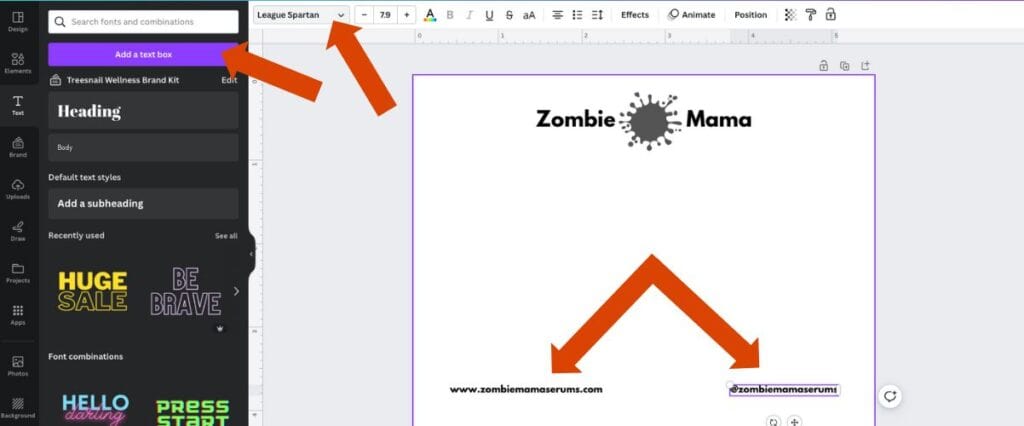
Next, we’ll add contact information by selecting ‘Add a text box’ (the purple button to the left in the black toolbar).
Type in your website URL using your branded font pairings.
Make a copy of the text box, and this time type in the handle you use for all of your social media platforms.
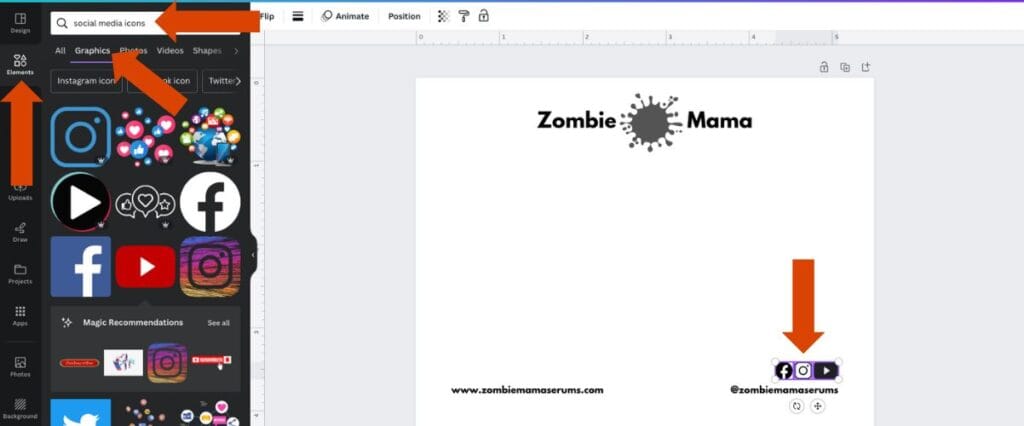
If you would like to add the icons for the social media platforms you are on, click on the ‘Elements’ icon in the black left sidebar and search for your favorite versions.
Adjust the colors and size of the icons as you see fit (I usually just make them all black and the same size in a row with the help of the Canva grid lines that lock into place).
That’s all the designing we’ll do since we’re keeping it super simple with a lot of space so that there is room to write our notes.
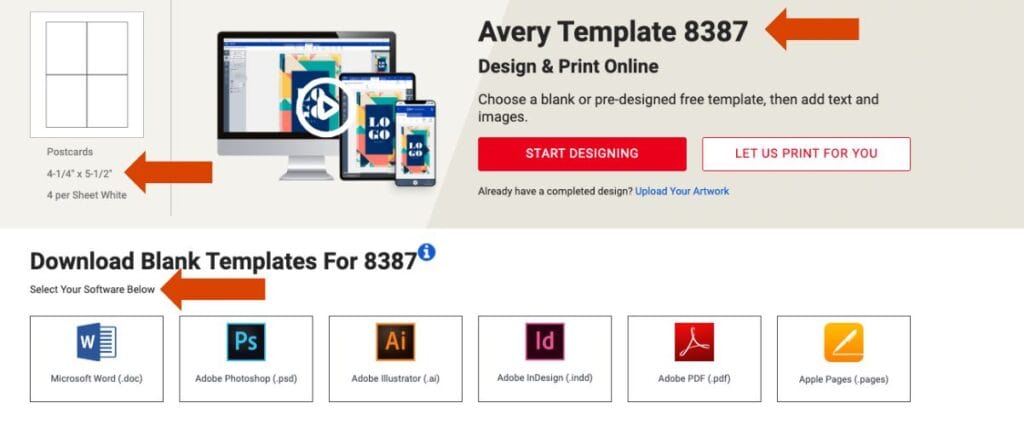
To print your thank you notes, click here to download Template 8387 from Avery.
Download the template to whatever software program you usually use (Avery gives you 6-7 choices), and open the file.
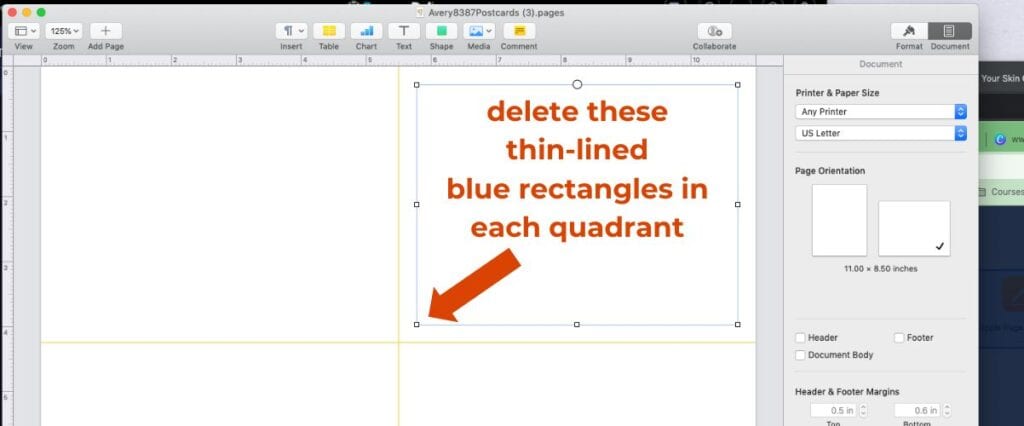
Next, delete the squares (shown with a thin blue line and 8 white dots) inside each quadrant of the template so that our design will reach from edge to edge.
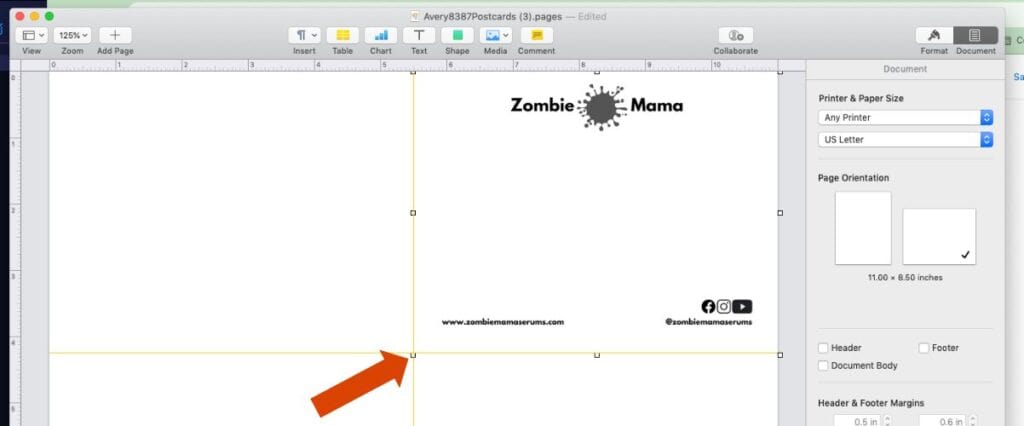
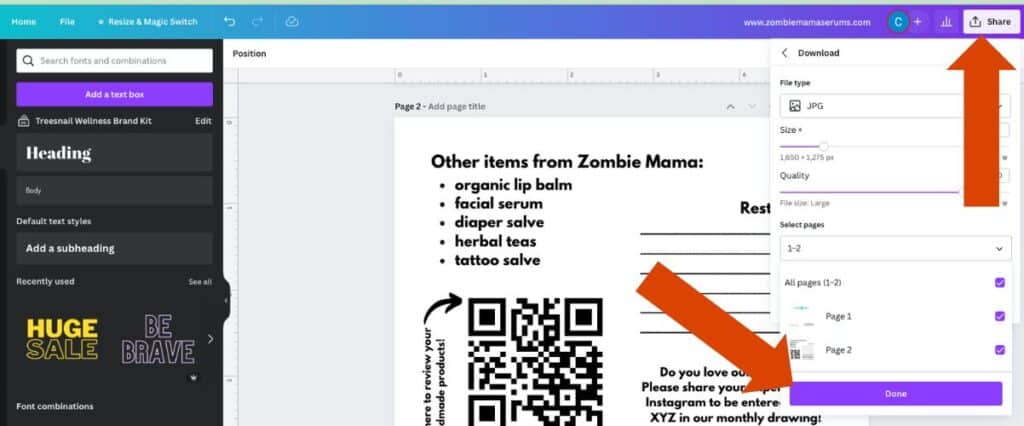
Go back to Canva to download your thank you note design as an image, and then drag that image straight into the Avery template.
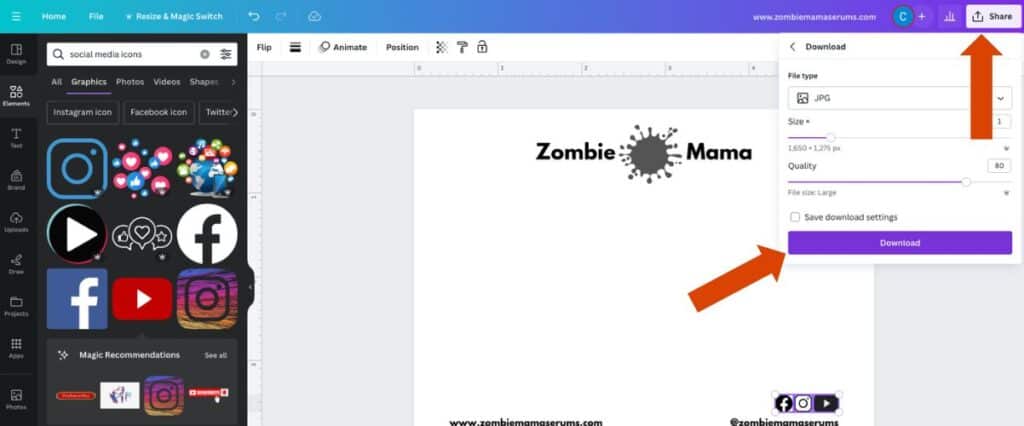
Drag your downloaded image straight into the Avery template, click on one of the corner dots on your postcard design, and resize/move to have it ‘snap’ into one of the template quadrants.
Copy and paste your design 3 more times, dragging each one into a separate quadrant on the Avery template.
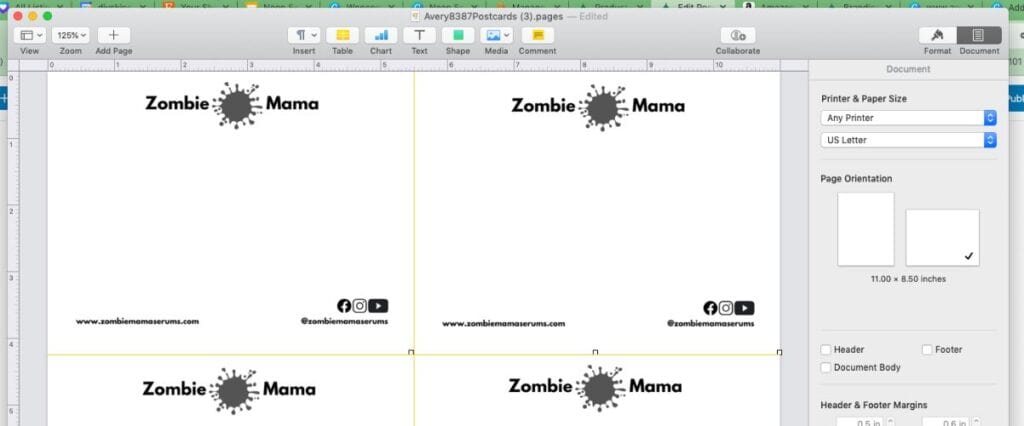
After you’re a happy camper, simply load the postcard paper into your printer, print your thank you note design, and gently fold and tear on the perforated lines.
Nothing is easier than that to design for your entire business!
Designing Two-Sided Thank You Notes (Professional Printing)
In this tutorial, we’ll be making a two-sided thank you note that we’ll have professionally printed.
By having our designs professionally printed, we can add color back into our designs (if you removed it from the design above when following the ‘print from home’ tutorial).
Creating a two-sided business thank you note also allows you to include more information that will increase visits and engagement with your brand.
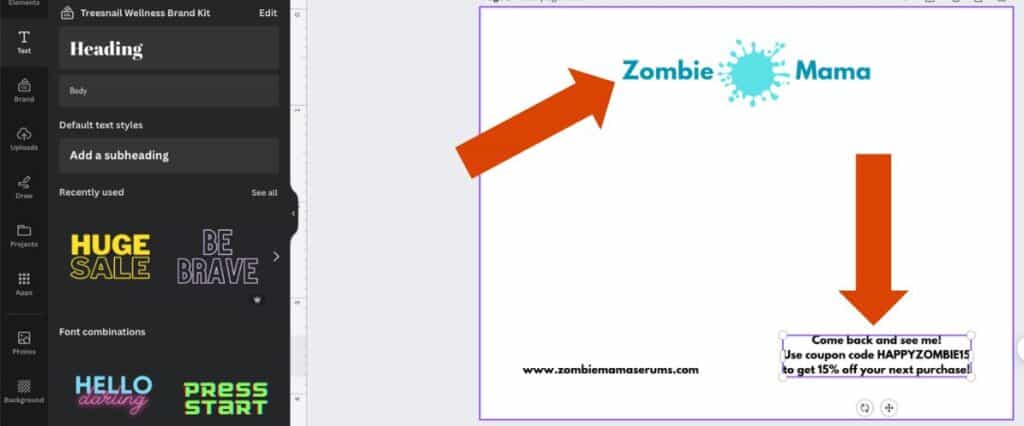
Starting with my previous design in Canva, I’m going to add my branded color palette back into my logo design and also change the social media handle in the lower righthand corner into a note about a coupon code.
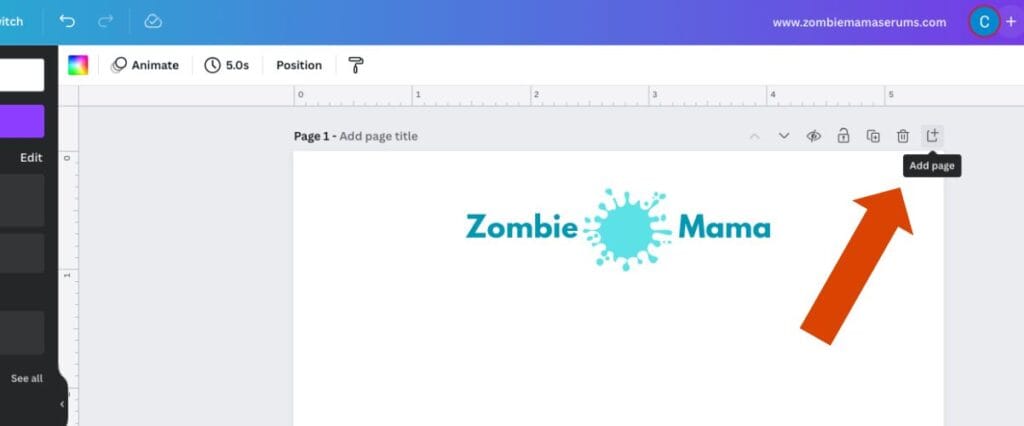
Next, add a new page to your Canva design by clicking on the ‘+’ Add Page icon in the upper right-hand corner of the canvas.
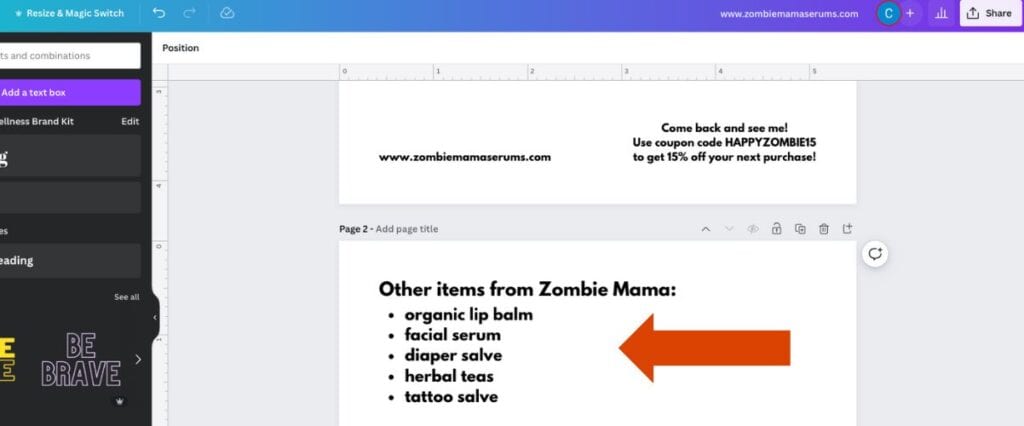
On this second page (which will be the back side of your thank you note), have fun adding additional information that will keep your customers returning to visit you for more products or engaging with you on your social media platforms.
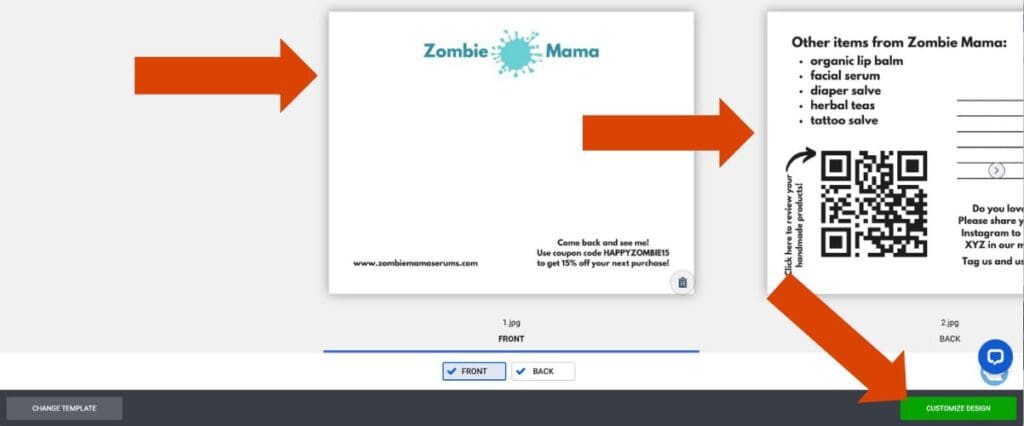
First, I’ll add a small list of other products I have in my handmade business to jog their memory (or in case this person is a gift recipient and doesn’t know about my line already).
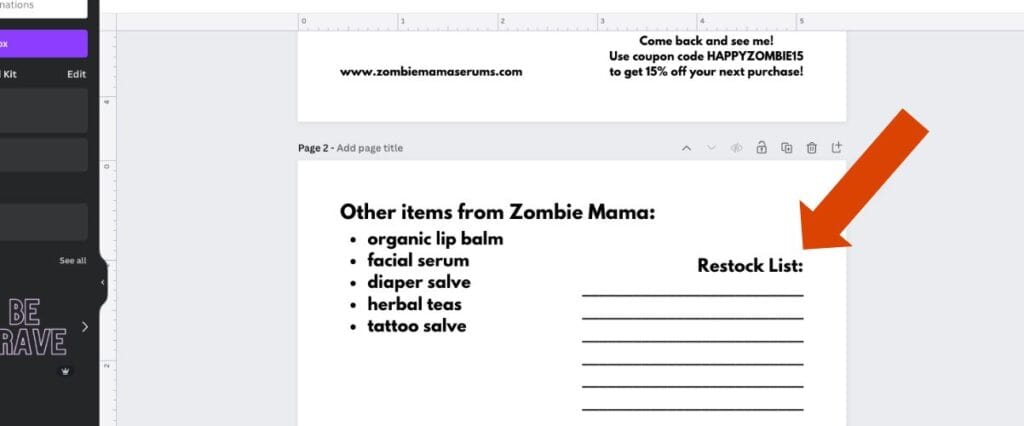
I might also add a section that has blanks in it for my customer to have a handy place to write down what they need to restock as they run out of product (this will encourage them to keep the thank you note on their fridge or in their purse).
You can also generate a custom QR code in Canva. This is a grid-like graphic that is scanned with the camera of a smartphone and takes you to a designated website.
This would be an AWESOME inclusion on your thank you notes to direct your customers right to a review page or newsletter signup.
(In the left black toolbar, click on ‘Apps’ then scroll down a bit until you see a section that says ‘Popular’, click on the icon that says ‘QR Code’ – you will then be prompted to provide a unique URL of your choosing.)

Consider other high-engagement details, such as mentioning a branded hashtag for a monthly drawing or UGC content (always a winner)!
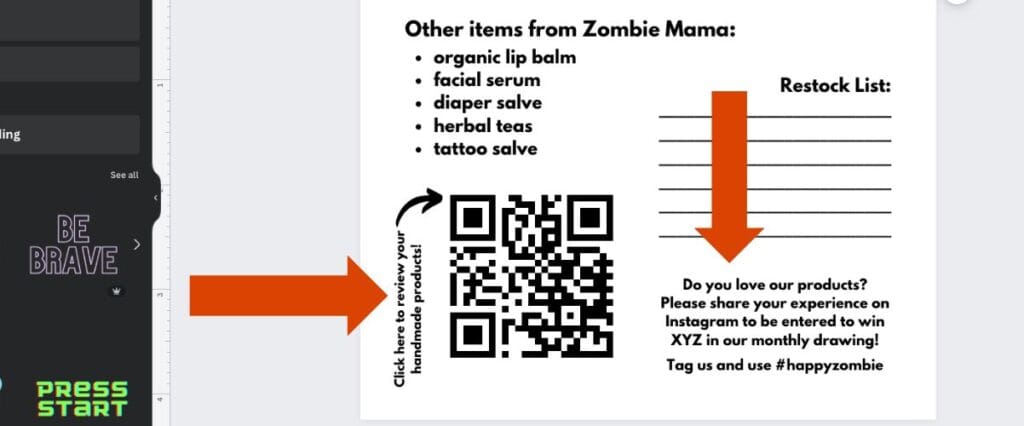
When you’re happy with your design, download both pages of your thank you note design and head over to Avery with this link to have it printed.
You can choose from different edges on your postcards since Avery will be printing your thank you cards, just make sure your design fits within these parameters before approving the printing.
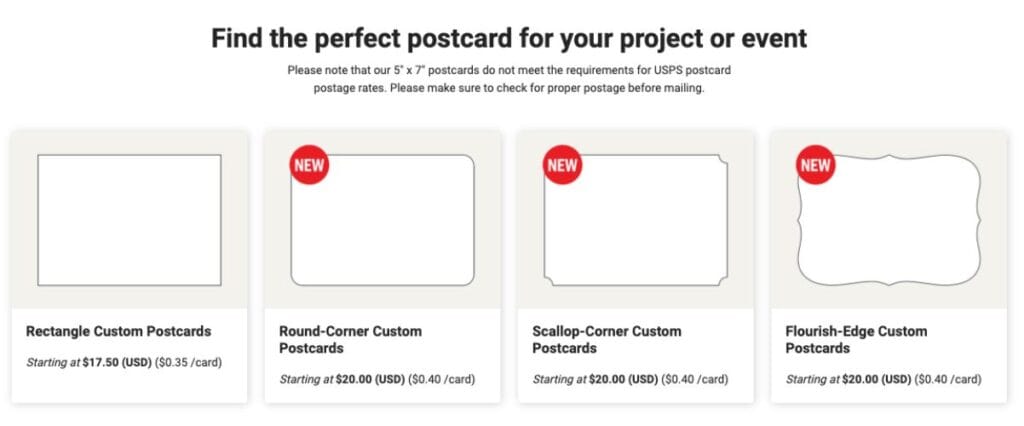
Follow the menu selections that fit your thank you note design.
(I’m choosing 4.25″ x 5″, Wide, Printed on Two Sides, and then Upload a Completed Design.)
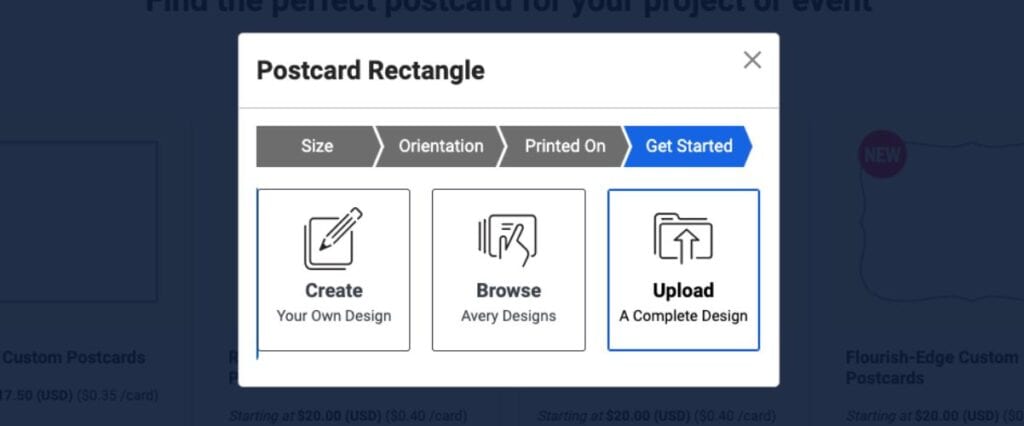
Upload your Canva images to the front and back sides of the thank you card to Avery and then click on the green ‘Customize’ button in the lower right-hand corner.
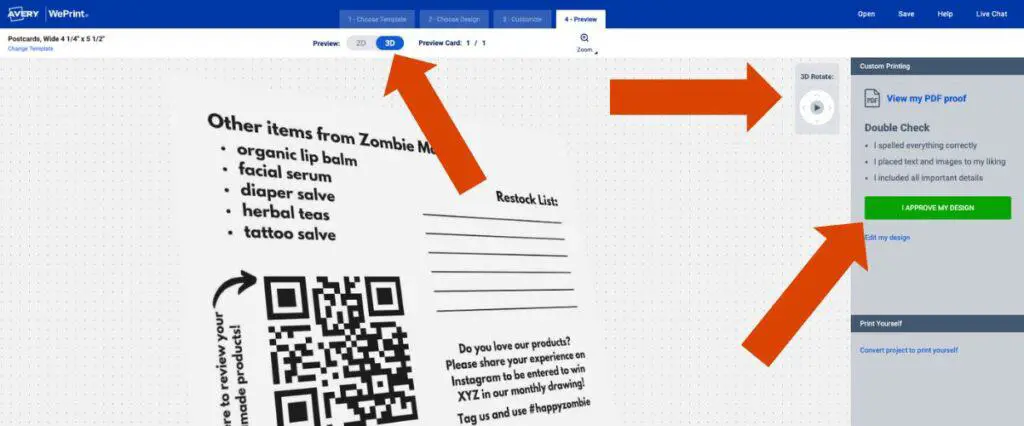
Since we designed it in Canva, you shouldn’t need to make any adjustments on this next screen. However, if you decide to, this is where you would add any background colors, crop, or add any other details you’d like using Avery’s design program.
When you’re finished, click on the green ‘Next’ button in the lower right-hand corner.

In this step, you’ll check your thank you card proof to make sure it’s good to go. You can view in 2D (click on the ‘Front’ and ‘Back’ to view both sides) or 3D (drag your mouse on the image to rotate it freely).
Next, click on the green ‘I Approve My Design’ on the right-hand side of the page (save to Avery if you want).
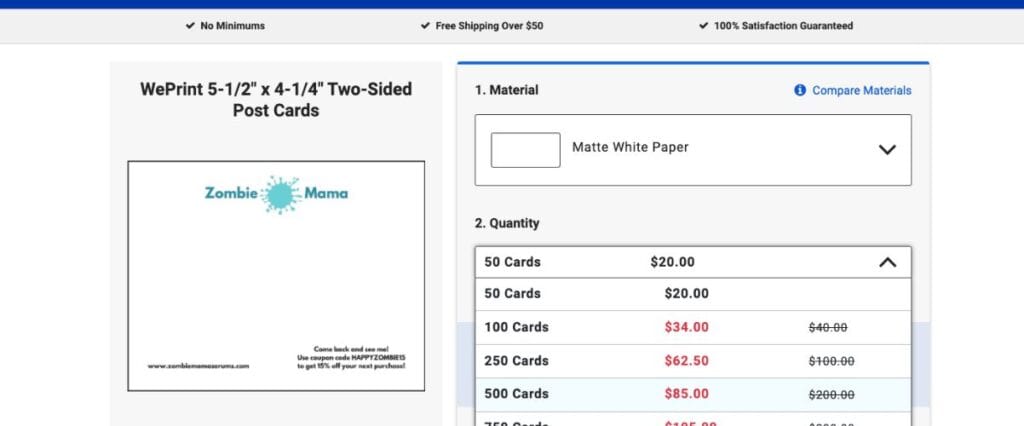
This last section we’ll cover here allows you to choose the material your thank you notes will be printed on and the quantity.
You’ll 100% absolutely want to choose the Matte White Paper. This will allow you to actually WRITE on the paper, as well as your customer to add notes to it as well.
Take note that the larger quantity you purchase, the more the cost* goes down per note. This is a great thing to buy in bulk (just make sure the info on your thank you note won’t change in the near future!).
*Make sure you check the current pricing, as there is no guarantee the costs in the screenshot below will be the same as when I created this tutorial.
How to Manage Your Thank You Notes as Your Handmade Business Grows
In the beginning of your business journey, when orders are just starting to trickle in, taking the time to write genuine thank you cards for your handmade business customers is pretty easy (and exciting!).
Eventually, you are going to have an exponentially growing customer base that keeps coming back again and again and you won’t have as much time to write out lengthy thank you notes.
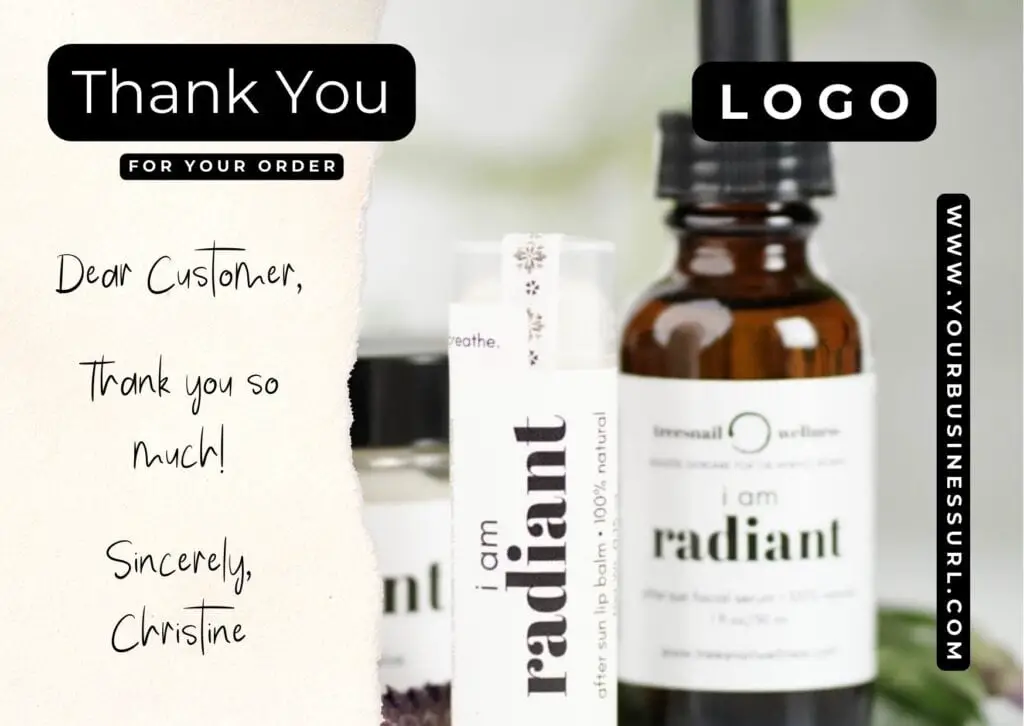
At that time, instead of having a card with a large white space for writing, consider designing a new business thank you note that has a picture of you, your most popular seller, or your entire product line.
On top of the picture in a bold, dark color, be sure to still write a personalized greeting, but make it shorter.
“Hi (Customer’s First Name)! Thank you so much! Sincerely, (Your First Name)
Clearly, this will take much less time, but you’re still making the effort to be personal and provide that ‘handmade love’ that customers want to receive.
Get Feedback on Your Skin Care Business Thank You Note Design!
Writing business thank you notes as handmade sellers are such a huge win – do not skip this detail!!! It will be a SLAM DUNK for you and the foundation of your business.
If you have a handmade skincare business and would like feedback on your thank you card design, head over to our private community Facebook Group and share what you’ve made!
Grow Your Skin Care Business!
Browse through the resources below to boost your handmade business visibility and profitability!